Catégorie : BEAUTÉ – BEAUTY

Beauté, astuces, makeup, maquillage, nail art

  • HUDA BEAUTY ÇA EN VAUT LA PEINE ?! / IS HUDA BEAUTY WORTH IT ?!

    HUDA BEAUTY ÇA EN VAUT LA PEINE ?! / IS HUDA BEAUTY WORTH IT ?!

    Heyyyy !

    Comment est-ce que vous allez mes Beautyers ? ☺️ j’espère que vous allez bien en tout cas ! je vous retrouve aujourd’hui pour vous parler de quelques produits de HudaBeauty et vous donnez un peu mon avis sur ces produits. Donc en faite c’est une commande qui remontes à un peu loin lol mais comme je commande aux USA et que je me fais livrée avec un service de ré-expédition qui se nomme Relay Shop USA (d’ailleurs il faut que je vous fasse un article là-dessus) eh bien ça a pris un peu de temps pour que les produits arrivent jusqu’à chez moi. Parce que déjà lorsque j’ai passée la commande sur le site de HudaBeauty, j’avais reçus un mail me disant que ça va prendre un peu temps pour qu’ils envoient ma commande parce qu’ils étaient un peu surmener et donc après 3 semaines d’attente là ils ont commencé à envoyer le colis donc ensuite ça a pris au moins 3 ou 5 jours pour que ça arrive au service de ré-expedition que j’utilise et ensuite une fois arrivé là-bas j’ai commencée à faire la ré-expédition mais sauf qu’avec le Covid-19 dans la nature il y avait des perturbations pour les colis donc j’ai du attendre au moins 2 ou 3 mois pour recevoir mon colis en main propre ! mais il est enfin arrivé et mes produits sont intacte c’est tout se qui compte 😍


    {English Version}

    How are you my Beautyers ? ☺️ I hope you’re all well ! I’m back today to talk to you about some HudaBeauty products and to tell you a little what I think about it. So these items are from an order that I did since a long time already lol but as I’m use to order my products in the USA and that I use a re-expedition service called Relay shop USA (by the way I have to write an article about it) well it took some times for the order to arrive here with me. Because when I ordered on HudaBeauty website, I received an email telling me that they gonna take some times to prepare and send my order because they had a lot of orders too to prepare so they were really busy and after 3 weeks they sent my order so this took like 3 ou 5 days to arrive at my re-expedition service and then once it has arrived I started the re-expedition but as the Covid-19 is in nature there were a lot of disruptions so I waited 2 or 3 months to receive my package in my hands ! but the products have arrived and they are still flawless so that’s all that matters 😍


    HUDA BEAUTY ÇA EN VAUT LA PEINE ?! / IS HUDA BEAUTY WORTH IT ?!

    HUDA BEAUTY ÇA EN VAUT LA PEINE ?! / IS HUDA BEAUTY WORTH IT ?!

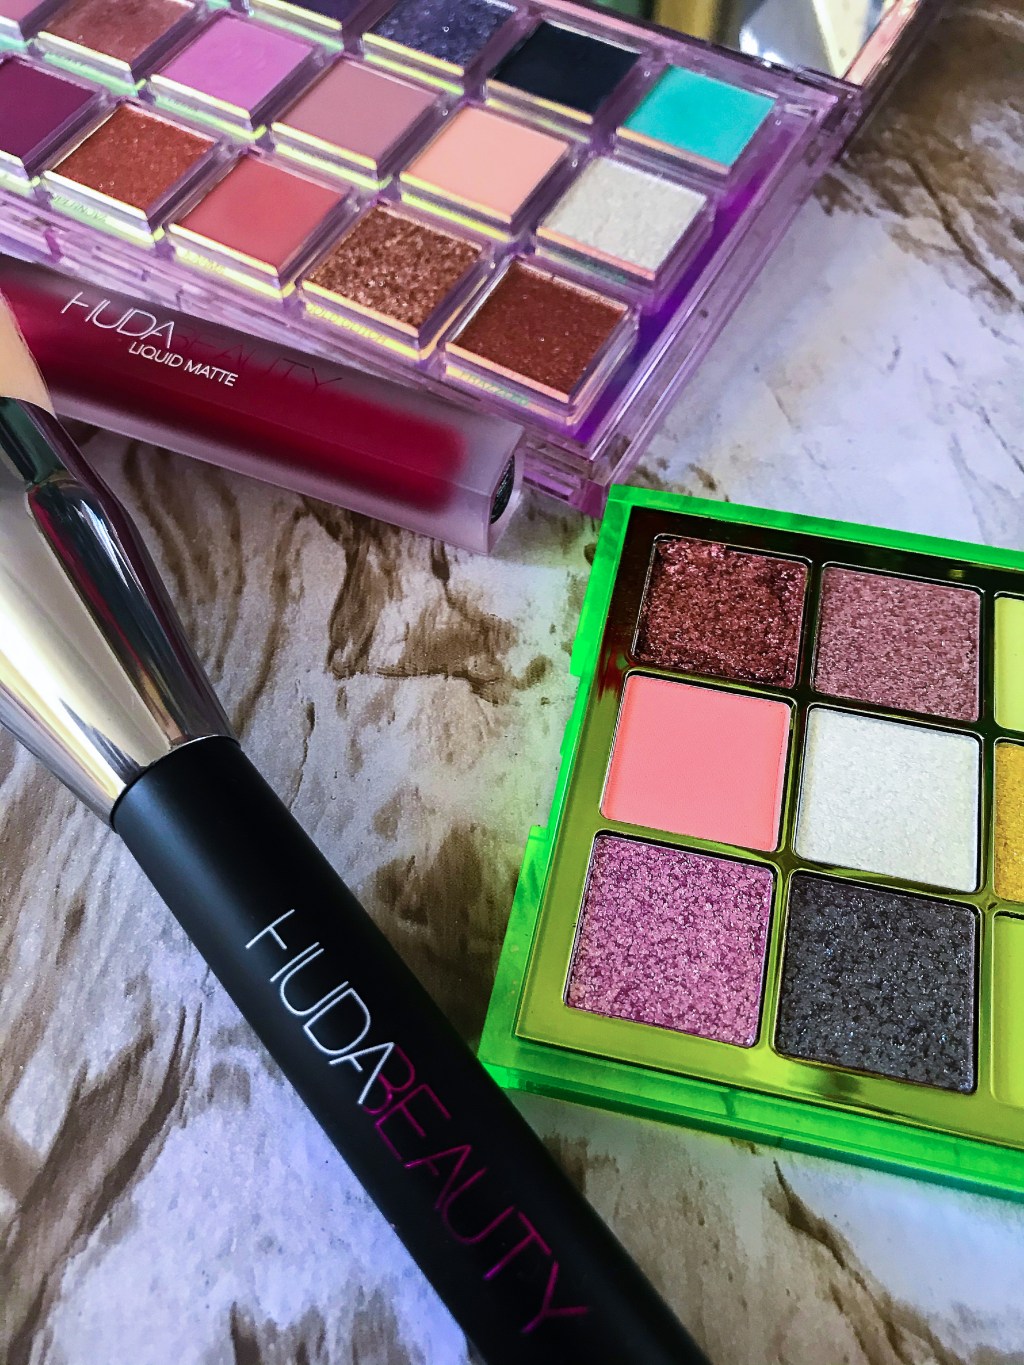
    Et on commence avec cette petite palette de la collection Neon Obsession appelée Neon Green, c’est une palette que je voulais absolument non seulement parce que les fards sont magnifiques mais aussi et spécialement pour ce fard à paupière vert fluo tout en haut à droite que j’adore 😍  et elle superbe cette palette parce qu’il y a des fards matte mais aussi des fards pailletés et les couleurs aussi me plaise beaucoup et les fards sont bien pigmentés et facile à travailler comme je les aimes ! Les palettes de cette collection existent aussi dans d’autres couleurs, il y a du rose fuchsia et du orange aussi et à chaque palettes il y a des couleurs un peu fluo.

    Let’s start with this little palette from the Neon Obsession Collection called Neon Green, I really wanted this little palette not only because the eyeshadows are wonderful but also and especially because of this neon green eyeshadow at the top on the right that I love 😍 and this palette is superb because there are matte eyeshadows but there are also shimmery eyeshadows and I love the colors and the eyeshadows are pigmented and easy to work with just as I like it ! The palettes of this collection exist in other colors, there are a pink and orange one too and in each palettes there are neon color.


    HUDA BEAUTY ÇA EN VAUT LA PEINE ?! / IS HUDA BEAUTY WORTH IT ?!

    HUDA BEAUTY ÇA EN VAUT LA PEINE ?! / IS HUDA BEAUTY WORTH IT ?!

    HUDA BEAUTY ÇA EN VAUT LA PEINE ?! / IS HUDA BEAUTY WORTH IT ?!

    Et maintenant on passe à la plus grosse palette ! il me fallait absolument cette palette elle est trop magnifique 😍, le thème de la palette j’adore de ouf ! j’arrête pas de vous dire à quel point j’adore cette palette et j’ai oubliée de vous dire son nom 😂 donc elle s’appelle Mercury Retrograde 🪐 et les fards vont très bien avec le nom c’est à dire que le thème de la palette c’est l’espace et la palette porte le nom d’une planète Mercure ☺️ franchement cette palette je la met dans mes must-have pour ces fards sublimes et pigmentés et notamment pour les couleurs on a du mauve, du bleu pastel etc et il y a des fards mats et des fards pailletés aussi donc c’est un ensemble parfait pour moi et idéal pour toutes sortes d’évènements ! 

    And now let’s talk about the big one ! I needed this palette it’s so wonderful 😍, I love the palette’s theme so much !  I can’t stop telling you how much I love it but I forgot to tell you its name 😂 so this palette is called Mercury Retrograde 🪐 and the eyeshadows match perfectly with the palette’s theme cause the theme is space and this palette is called Mercury which is the name of one planet Mercury ☺️ honestly this palette I put it into my must-have for its beautiful and pigmented eyeshadows and also for the colors we have purple, a pastel blue etc there are mattes and shimmering eyeshadows too so for me this a perfect match and it’s perfect for every occasions ! 


    HUDA BEAUTY ÇA EN VAUT LA PEINE ?! / IS HUDA BEAUTY WORTH IT ?!

    Passons au pinceau ! c’est le pinceau Face Buff & Blend, alors je n’avais jamais testé l’un de ces pinceaux mais ce pinceau dès que je l’ai vu j’ai craquée il me semblait si parfait donc je l’ai prise et après l’avoir testé eh bien les gars j’avais bien raison je ne me suis pas tromper sur lui ! c’est de la bombe ce pinceau d’ailleurs je l’ai utilisé dans une vidéo qui arrive prochainement 😉 et je l’utilise principalement pour appliquer mon fond de teint mais je pense qu’on peut l’utiliser aussi pour mettre son bronzer. Il applique si bien mon fond de teint, il est si doux au toucher et le résultat est parfait ! rien à dire pour ce pinceau il fait son job comme un pro et je l’adore 😍

    Let’s talk about the face brush ! this is the Face Buff & Blend Brush, so I’ve never tried any brush from HudaBeauty but when I saw this brush I literally fell in love with it this brush seemed so perfect so I took it and after trying it at home well guys I was right I didn’t get wrong about it ! this brush is bomb by the way I used it in one of my next makeup video which is coming soon 😉 and I use it mainly to apply my fondation but I think that you can use it for bronzer too. This brush apply so well my foundation, it’s so smooth on the skin and the result is perfect ! there’s nothing wrong to say about it it does its job like a professional and I love it 😍 


    HUDA BEAUTY ÇA EN VAUT LA PEINE ?! / IS HUDA BEAUTY WORTH IT ?!

    HUDA BEAUTY ÇA EN VAUT LA PEINE ?! / IS HUDA BEAUTY WORTH IT ?!

    HUDA BEAUTY ÇA EN VAUT LA PEINE ?! / IS HUDA BEAUTY WORTH IT ?!

    Et pour finir, je me suis pris ce rouge à lèvre c’est le rouge à lèvre Cheerleader c’est un liquide mat et je me le suis pris tout simplement parce que j’adore les rouge à lèvres HudaBeauty et ces rouges à lèvre sont hyper pigmentés, ils durent des heures, ils sont très confortable et vous avez juste une petite odeur sucrée non désagréable 💕

    And finally, I took this lipstick it’s a liquid matte lipstick called Cheerleader and I took it simply because I love HudaBeauty’s lipsticks and these lipsticks are so pigmented, it lasts for hours, they are so comfortable on the lips and it smells like candies and it’s not unpleasant at all 💕


    Et c’est tout pour aujourd’hui !

    j’espère que cette petite revue sur les produits de la marque HudaBeauty vous aura plu ☺️

    et n’hésitez pas à me dire dans les commentaires votre ou vos palettes qui pour vous seraient

    des must-have? et dites moi vous aimez les produits HudaBeauty ? 

    Et n’hésitez pas à venir me suivre sur Instagram (à retrouver un peu plus bas) et 

    à vous abonner au blog juste dans la colonne de droite 😉

    je vous souhaite à tous un très bon week-end ! 


    And that’s it for today ! 

    I hope that you liked this review on HudaBeauty’s products ☺️ and feel free to tell me

    in the comments what is or what are your palettes that you would add in your must-have ?

    and tell me do you like HudaBeauty’s products ? 

    And don’t forget to follow me on Instagram (check it just below) and to follow the blog

    just on your right 😉

    Have a beautiful weekend guys !


    A bientôt !

    See you soon !


    XOXO ✌🏼 💋


    Retrouvez moi aussi sur les réseaux sociaux 😉 / follow me on social media 😉 :


  • DISNEY’S PRINCESS JASMINE MAKEUP LOOK / MAKEUP LOOK DE LA PRINCESSE JASMINE DE DISNEY

    DISNEY’S PRINCESS JASMINE MAKEUP LOOK / MAKEUP LOOK DE LA PRINCESSE JASMINE DE DISNEY

    Hey mes Beautyers !

    Comment est-ce que vous allez ? moi je vais très bien ! ça vous dit un total makeup look aujourd’hui ? 😉 parce que dans la vidéo d’aujourd’hui j’ai décidée de me transformer en une princesse Disney 😏 et vous l’aurez sans doute deviner j’ai choisi Jasmine de Aladin ! Je dois vous l’avouez que au début je pensais que ça n’allait pas être très ressemblant vu que je n’ai pas les vêtements etc mais en fouillant dans mes placards et en empruntant les boucles d’oreilles de ma mère j’ai réussi à compléter le look haha 😝 et je dois dire que c’est plutôt réussi et j’adore le résultat ! D’ailleurs je pense, que je n’ai pas encore fini avec Aladin puisque cette semaine j’ai eu une nouvelle idée pour un autre makeup que je réaliserai plus tard et ça sera en rapport avec Aladin aussi 😋 vous avez une petite idée de ce que ça pourrait être ? dites moi ça dans les commentaires ! maintenant j’arrête de papoter et je vous laisse sans plus attendre regarder la vidéo ! 

    C’est parti !


    {English Version}

    How are you guys ? I’m great ! what about a total makeup look transformation for today ? 😉 because in today’s video I decided to transformed myself into one of the Disney’s princesses 😏 and you may have guessed I chose Jasmine from Aladin ! Honestly at first I was thinking that I was not gonna make it because I don’t have the costume for it etc but after searching in my closet and borrowed my mom’s earrings I was able to complete the look haha 😝 and I personally find it really nice and I love the result ! By the way I think, that I’m not finish with Aladin because this week I had a new idea for another makeup that I’ll film later and it will still about Aladin 😋 do you have an idea of what could it be ? tell me that in the comments ! now I’m gonna stop chatting and let you watch the video ! 

    Let’s go !


    PRODUITS UTILISÉS / PRODUCTS USED:

    ❤︎ Le Fond de teint Double Wear Stay In Place de Estée Lauder / Estée Lauder Double Wear Stay In Place Foundation

    ❤︎ Skin Concealer (anti-cerne) en teinte Peanut de Kylie Cosmetics  / Kylie Cosmetics Skin Concealer in the shade Peanut

    ❤︎ Anti-cerne Born This Way Super Coverage de Too Faced / Too Faced Born This Way Super Coverage Concealer

    ❤︎ La Poudre Libre Translucent de Kylie Cosmetics / Kylie Cosmetics Translucent Setting Powder

    ❤︎ La Palette Mercury Retrograde de Huda Beauty / Huda Beauty Mercury Retrograde Palette

    ❤︎ Le Ink Liner en teinte Trooper de Kat Von D Vegan Beauty / Kat Von D Vegan Beauty Ink Liner in the shade Trooper

    ❤︎ La Palette Rose Gold Remastered Palette de Huda Beauty / Huda Beauty Rose Gold Remastered Palette

    ❤︎ Blush en teinte Rosy de Kylie Cosmetics / Kylie Cosmetics Pressed Blush Powder in the shade Rosy

    ❤︎ Faux Cils magnétique « Dramatic » de Wake Up & Make Up / Wake & Make Up « Dramatic » Magnetic False Eyelashes 

    ❤︎  Le Crayon à lèvre Red Velvet Kylie Cosmetics / Kylie Cosmetics Red Velvet Lip Liner 

    ❤︎ Le Rouge à lèvre liquide Red Velvet de Kylie Cosmetics /Kylie Cosmetics Red Velvet Liquid Lipstick

    ❤︎ Spray Fixateur Maquillage Fix+ à la Rose de Mac Cosmetics / Mac Cosmetics Fix+ Rose Smell Setting Spray


    Et c’est tout pour aujourd’hui mes Beautyers !

    j’espère que ce total makeup look vous aura plu et n’hésitez pas à me dire dans les commentaires

    si vous aimeriez que je fasse un autre total look d’une autre princesse Disney ? si oui la ou lesquelles ?

    d’ailleurs quel votre ou vos princesses Disney préférées ? 

    Après tout on garde tous notre âme d’enfant j’ai pas raison ? haha 😉


    And that’s it for today my Beautyers !

    I hope you like this total makeup look transformation and feel free to tell me in the comments

    if you’d like me to do another total makeup look transformation of another Disney’s princess ? if yes which one or ones ?

    by the way who is your favorite or your favorites Disney’s princesses ? 

    We all keep our child soul after all am I right ? haha 😉


    A bientôt !

    See you soon !


    XOXO ✌🏼 💋


    Retrouvez moi aussi sur les réseaux sociaux 😉 / follow me on social media 😉 :


  • J’AI TESTÉE OLEHENRIKSEN 👍🏼👎🏼 / I TRIED OLEHENRIKSEN 👍🏼👎🏼

    J’AI TESTÉE OLEHENRIKSEN 👍🏼👎🏼 / I TRIED OLEHENRIKSEN 👍🏼👎🏼

    Hello mes Beautyers !

    J’espère que vous allez bien ☺️ moi ça va la routine quoi et j’essaye de profiter un peu des vacances ! je vous retrouve aujourd’hui pour un nouvel article où je vais vous parler et vous donner mon avis au sujet des produits de la marque Olehenriksen.

    Ça faisait un bon moment que j’en entendais parler de cette marque et comme je venais de finir mes produits de KylieSkin (d’ailleurs je vous ai fait une revue sur les produits KylieSkin juste ICI) je me suis dit que ça serait bien que je teste une nouvelle marque de soin et j’ai profité de l’occasion pour tester la marque Olehenriksen.

    Pour vous en dire un peu plus sur la marque si vous ne la connaissait pas, c’est une marque d’origine Danoise mais fabriquée aux États-Unis et donc vendu aux USA mais aussi dans les Sephoras du monde entier depuis un moment déjà je crois donc vous pouvez aussi en trouver dans Sephora France normalement.

    Avant de vous parlez des produits et de vous dire ce que je pense des produits, je vais vous parlez un peu au niveau des prix des produits. Donc moi je les ai commandés sur le site officiel directement ICI donc c’est à dire aux USA et pour ce qui est des prix je trouve que c’est moyennement accessible puisque les produits coûte aux alentours des 40 € – 50€ donc c’est quand même un peu cher je trouve mais ça reste quand même accessible sachant qu’ils ont des promos assez souvent.

    Et maintenant je vais vous montrer ma petite sélection c’est parti !


    {English Version}

    I hope you’re all fine ☺️ for me it’s like usual days and I’m enjoying my holidays ! I’m back today with a new article where I’m gonna talk and give you my opinions about Olehenriksen’s products.

    It’s been quite a long time that I heard about this skin-care brand and as I was finishing my KylieSkin’s products (by the way I wrote a review about the KylieSkin’s products just HERE) I wanted to try a new skin-care brand and I chose to try out Olehenriksen.

    To tell you more about the brand, it’s a Danish brand but made in the United States so the products are sold in the USA but also in the Sephoras stores in the world too I think so normally you can find them in the Sephoras in France.

    Before talking about the products and telling you what I think about it, I’m gonna talk first about the prices of the products. So I ordered them on the official website HERE so that mean in the USA and for the price I think that there are moderately affordable the products cost around 40$ – 50$ so it’s quite expensive but it’s still affordable knowing that they often have sales.

    And now I’m gonna show you my selection let’s go !


    J'AI TESTÉE OLEHENRIKSEN 👍🏼👎🏼 / I TRIED OLEHENRIKSEN 👍🏼👎🏼


    J'AI TESTÉE OLEHENRIKSEN 👍🏼👎🏼 / I TRIED OLEHENRIKSEN 👍🏼👎🏼

    J’ai pris cette eau pour visage La Pure Nature Facial Water à la provitamine B5, extraits de concombre et camomille que j’utilise comme un Toner. Je l’adore ! je l’utilise avant de mettre ma crème pour pouvoir bien enlever le calcaire (que l’on oublie souvent qui est présente dans l’eau du robinet quand on se lave le visage) et pour enlever les restes de makeup de la veille. Et franchement, c’est un bon produit et j’adore l’odeur ça sent le concombre et quand vous le mettez sur le visage ça rafraîchis c’est tellement agréable 🥰

    I took this Facial Water The Pure Nature Water with Provitamin B5, cucumber and chamomile extracts. I love it ! I use it before my face cream to remove all the limescales (that we used to forget which is right in the tap water that we use to wash our face) and to remove makeup remains from the day before. And frankly, it’s a good product and I love the cucumber smell and when you apply it on your face it’s refresh your entire face and it’s so nice 🥰


    J'AI TESTÉE OLEHENRIKSEN 👍🏼👎🏼 / I TRIED OLEHENRIKSEN 👍🏼👎🏼

    Lors de ma commande, j’ai reçu en cadeau cette petite crème pour les mains La Force of Nurture Intensive Hand Crème au beurre de kpangnan et extraits de cassis et d’échinacée. Je dois dire que c’était super de le découvrir, je l’aime bien elle est très nourrissante et nourrit la peau intensément. Et ce n’était pas le seul cadeau j’ai aussi reçus des lingettes démaquillantes (désolé mais je ne l’ai tellement pas aimé que j’avais hâte de la mettre à poubelle 😂 et j’avais oublié que je devais faire une revue sur les produits donc c’est pour cela que je n’ai pas de photo) que je n’ai malheureusement pas aimer du tout parce que je n’aimais pas l’odeur et les lingettes étaient un peu trop sèche à mon goût et elles étaient pas très performantes 😕 et on m’a également offert un échantillon de leur primer à la banane mais je n’ai pas encore tester (d’où l’absence de la photo) et dès que je l’aurai testé je vous dirai ce que j’en pense dans une de mes stories sur Instagram donc n’hésitez pas à me rejoindre ICI ☺️

    When I ordered my products, I received this little hand cream as a gift it’s The Force of Nurture Intensive Hand Crème made of Kpangnan butter, black currant and echinacea extracts. I can say that I was lucky to receive this little gift, because I discovered this hand cream and I really like it it’s really nourishing and nourish instantly your skin. And that was not the only one, I also received some makeup remover wipes (but I didn’t like it and I couldn’t wait to throw it in the trash can 😂 so I completely forgot that I was going to do a review on these products so that’s why I don’t have a photo of it sorry) that I don’t like because I can stand the odor and the wipes were too dry and they were not doing their job correctly 😕 and I also received a sample of their Banana Face Primer but I haven’t try it yet (that explain the fact that I didn’t show you the sample) and as soon as I’ll try it I’ll tell you what I think about it in one of my Instagram stories so feel free to join me HERE ☺️


    J'AI TESTÉE OLEHENRIKSEN 👍🏼👎🏼 / I TRIED OLEHENRIKSEN 👍🏼👎🏼

    Et enfin j’ai pris cette crème pour visage, c’est La Nurture Me Moisturizing Crème fait d’un mélange multivitaminé et à l’huile d’églantier. Cette crème est pas mal je dirais, elle fait son job mais il manque encore une petite touche d’hydratation mais à part ce petit détail il est pas mal et l’odeur n’est pas désagréable en tout cas elle n’est pas forte et elle sent la fraicheur j’ai bien aimé 👌🏼

    And finally I took this Face Cream, The Nurture Me Moisturizing Crème made of a multi-vitamin blend and rosehip fruit oil. This face cream is not bad I’d say, it does its job but I think it needs more hydration in it but apart from this little detail it’s not that bad and the odor is not disagreeable and it does not has a strong odor and it smells like something fresh and I really liked 👌🏼


    Et c’est tout pour aujourd’hui mes Beautyers !

    j’espère que cette petite revue vous aura plu et

    n’hésitez pas à me dire dans les commentaires si vous l’avez déjà tester ?

    et quel est votre marque favorite en terme de soins pour visage ? 

    je suis curieuse de connaitre vos marque préférées 🥰


    And that’s it for today my Beautyers !

    I hope you like this skin-care review and feel free to tell me in the comments

    if you have ever tried this brand ? and what is your favorite skin-care brand ?

    I’m curious to know your favorites skin-care brands 🥰


    A bientôt !

    See you soon !


    XOXO ✌🏼 💋


    Retrouvez moi aussi sur les réseaux sociaux 😉 / follow me on social media 😉 :


  • FULL MATTE COLORED MAKEUP LOOK ⎟MAKEUP TUTORIAL

    FULL MATTE COLORED MAKEUP LOOK ⎟MAKEUP TUTORIAL

    Hello tout le monde !

    J’espère que vous allez bien ☺️ je vous ai préparée un nouveau makeup look pour aujourd’hui ! et je dois dire que c’est un makeup bien coloré pour la vidéo d’aujourd’hui haha 😝. Pour vous en dire un peu plus, j’ai réalisée un makeup mat c’est à dire que tout les produits que j’ai utilisée dans la vidéo ont un fini mat du coup c’est un makeup sans highlighter malheureusement parce que sinon ça n’irait pas dans le thème lol et prochainement je vous ferai un makeup où je ferai le contraire 😜. Allez je vous en dit pas plus et je vous laisse visionner la vidéo !

    C’est parti !


    {English Version} 

    I hope you’re all fine ☺️ I made a new makeup look for today ! and it’s kinda very colored for today’s video haha 😝. To tell you more, I made a full matte makeup look that means that all the products I used will give a matte finish and of course I didn’t use any highlighters unfortunately otherwise it would not match the theme lol and next time I’ll make a makeup look where I’ll do the contrary 😜. Now I’m not gonna tell you more and I’m gonna let you watch the video instead !

    Let’s start !


    FULL MATTE MAKEUP LOOK ⎟MAKEUP TUTORIAL

    FULL MATTE MAKEUP LOOK ⎟MAKEUP TUTORIAL


    ❤︎ Skin Concealer (anti-cerne) en teinte Peanut de Kylie Cosmetics  / Kylie Cosmetics Skin Concealer in the shade Peanut

    ❤︎ La Palette 35B Color Burst de Morphe Brushes / Morphe Brushes 35B Color Burst Palette

    ❤︎ Le Fond de teint Double Wear Stay In Place de Estée Lauder / Estée Lauder Double Wear Stay In Place Foundation

    ❤︎ Anti-cerne Born This Way Super Coverage de Too Faced / Too Faced Born This Way Super Coverage Concealer

    ❤︎ La Poudre Libre Translucent de Kylie Cosmetics / Kylie Cosmetics Translucent Setting Powder

    ❤︎ Blush en teinte Rosy de Kylie Cosmetics / Kylie Cosmetics Pressed Blush Powder in the shade Rosy

    ❤︎ Faux Cils magnétique « Dramatic » de Wake Up & Make Up / Wake & Make Up « Dramatic » Magnetic False Eyelashes 

    ❤︎  Crayon à lèvre Kourt K de Kylie Cosmetics / Kylie Cosmetics Kourt K Lip Liner 

    ❤︎ Rouge à lèvre 310 Berry Much de la collection Color Drama de Maybelline / Maybelline Lipstick from the Color Drama Collection in the shade 310 Berry Much


    C’est tout pour aujourd’hui mes Beautyers !

    j’espère que ce makeup look mat ultra coloré vous aura plus ! haha et dites moi dans les commentaires

    si vous aimez les makeup colorés ou pas ? si vous aimez les finis mat ou le contraire ? 🥰


    That’s it for today my Beautyers !

    I hope you like this full matte colored makeup look ! haha and tell me in the comments

    if you like colored makeup or not ? and do you like matte finish or the contrary ? 🥰


    A bientôt !

    See you soon !


    XOXO ✌🏼 💋


    Retrouvez moi aussi sur les réseaux sociaux 😉 / follow me on social media 😉 :


  • J’UTILISE UNIQUEMENT DE L’HIGHLIGHTER POUR ME MAQUILLER LES YEUX / I USE ONLY HIGHLIGHTERS FOR AN EYE MAKEUP LOOK⎢TUTORIEL

    J’UTILISE UNIQUEMENT DE L’HIGHLIGHTER POUR ME MAQUILLER LES YEUX / I USE ONLY HIGHLIGHTERS FOR AN EYE MAKEUP LOOK⎢TUTORIEL

    Bonsoir mes Beautyers !

    J’espère que vous allez tous bien ☺️ je vous retrouve aujourd’hui pour une nouvelle vidéo et dans cette vidéo je vais utiliser qu’une palette de highlighters pour me maquiller les yeux 😋

    Imaginez que vous êtes en vacances à l’étranger (je sais que c’est pas trop le moment de penser aux voyages avec le covid19 qui traine mais bon 😂) ou alors que vous êtes en déplacement et que vous avez emmené votre petite trousse de beauté avec vous mais que lorsque vous la sortait vous vous rendez compte que vous avez complètement oubliée d’emmener une palette 🤷🏻‍♀️ eh bien sachez que si vous avez de l’highlighter ou une palette d’highlighter avec vous vous allez pouvoir les utilisés en tant que fards à paupière pour vous maquillez 😉 et je vous ai donc fait un makeup des yeux uniquement avec une palette de highlighter ! 

    C’est parti !

    {English Version}

    I hope you’re all fine ☺️ I’m back today with a new makeup video and in this video I’m gonna use only a highlighter palette to do my eye makeup look 😋

    Imagine you’re on vacations in a foreign country (I know that it’s not really a good moment to think about travelling because of the covid19 but well 😂) or that you’re going somewhere far away from your home and that you brought your beauty accessories with you but when you take it out to do your makeup you realize that you have completely forgotten to bring an eyeshadow palette 🤷🏻‍♀️ well you should know that if you have a highlighter or a highlighter palette with you you can use them as eyeshadows 😉 and I made an eye makeup look using only a highlighter palette ! 

    Let’s go ! 


    PRODUITS UTILISÉS / PRODUCTS USED:

    ❤︎ La Palette Highlighter de la collection Winter de Huda Beauty / Huda Beauty Winter Collection Highlighter Palette


    Et voilà c’est tout pour aujourd’hui ! 

    j’espère que cette mini vidéo vous aura plu mais sachez qu’il y a d’autres alternatives

    pour se maquiller les yeux sans palette de fards à paupière mais je voulais vous en faire

    un avec cette palette d’highlighter parce que je l’adore 😍 et à vous maintenant

    de me dire si vous avez déjà utilisé de l’highlighter de cette façon ? 

    ou alors quels sont vos astuces à vous ? 😉


    And that’s it for today !

    I hope you like this short video but you know there are some other alternatives

    to do your makeup on your eyes without an eyeshadow palette but I wanted to do

    an eye makeup look with this highlighter palette because I love it 😍 and now it’s your

    turn to tell if you have already used highlighter in this way ? 

    or what are your hacks ? 😉


    A bientôt !

    See you soon !


    XOXO ✌🏼 💋


    Retrouvez moi aussi sur les réseaux sociaux 😉 / follow me on social media 😉 :


  • COMMENT FAIRE SÉCHER SON VERNIS RAPIDEMENT ET NATURELLEMENT EN QUELQUES SECONDES ? / HOW TO DRY YOUR NAILS QUICKLY AND NATURALLY IN JUST A FEW SECONDS ?

    COMMENT FAIRE SÉCHER SON VERNIS RAPIDEMENT ET NATURELLEMENT EN QUELQUES SECONDES ? / HOW TO DRY YOUR NAILS QUICKLY AND NATURALLY IN JUST A FEW SECONDS ?

    Hello mes Beautyers !

    J’espère que vous avez passé une agréable semaine ☺️ je vous retrouve aujourd’hui avec un nouvel article dans lequel je vais vous partager une astuce que j’ai récemment découverte et qui m’aide à faire sécher mon vernis très rapidement et naturellement c’est à dire que ce n’est pas un produit chimique ou je ne sais quoi mais c’est un produit naturel et facile à trouver que l’on va utiliser et grâce à cet élément naturel non seulement il va aider vos ongles à sécher rapidement en quelques secondes mais il va aussi nourrir vos ongles et cuticules et ainsi que renforcer vos ongles naturellement si c’est pas un miracle ça 🙈 d’ailleurs je me demande pourquoi je n’est pas fait ma petite recherche plus tôt parce que ça m’aurait grave aider pour éviter d’avoir un séchage trop long et me retrouver avec des marques sur les ongles le lendemain et donc de devoir recommencer le tout en particulier quand j’utilise un vernis assez claire qui nécessite plusieurs couches alors là je vous explique même pas la galère ! mais bon il est jamais trop tard comme on dit 😜


    Si vous aussi après votre pose de vernis vous vous retrouver avec des marques sur vos ongles le lendemain ou même dans la journée parce que votre vernis n’a pas sécher suffisamment alors que vous avez pourtant attendu des heures pour qu’il sèche eh bien sachez que vous n’êtes pas seule ! c’est d’ailleurs l’une des raisons pour laquelle j’avais décidée d’aller me faire vernir les ongles en institut et l’autre raison c’est parce que mes ongles sont d’origine fragile et donc ils se cassent facilement et du coup à chaque fois qu’ils prenaient de la longueur ils se cassaient automatiquement donc j’avais décidée d’aller en institut. En institut, je faisais un rallongement au gel mais le truc c’est que mes ongles naturels qui continuaient à pousser en dessous du rallongement gel, se cassaient quand même vu qu’ils sont fragiles du coup parfois je me cassais les ongles et avec un rallongement gel qui se casse avec croyez moi si ça a mal cassé ça fait très mal 😭 et là avec le confinement je ne pouvais malheureusement plus aller en institut du coup je me suis dit que je vais faire à l’ancienne et donc me vernir les ongles moi même avec du vernis. Et là ça a recommencé à chaque fois mon vernis n’avait pas sécher assez et je me retrouvais avec des marques 😩 et là j’ai décidée de faire ma petite recherche pour trouver une solution pour les faire sécher rapidement et comme il faut et vous allez me dire mais ils existent des durcisseurs ou des top coat qui garantissent un séchage rapide etc mais vu que mes ongles sont fragile j’ai peur de les fragilisés encore plus si j’utilise ce genre de produit qui contient beaucoup d’ingrédients qui pourraient être nocifs pour mes ongles ou vous allez me dire que je peux aller à nouveau en institut maintenant vu que on a été déconfiné enfin pas totalement mais bon pour l’instant je préfère attendre encore un petit peu et donc j’ai fait ma petite recherche.

    {English version}

    I hope you had a beautiful week ☺️ I’m back today with a new article where I’m gonna share with you guys a nails hack that I just discovered which help me to dry my nails with nail polish on quickly and naturally which mean that it’s not a chemical products or whatever dangerous things but instead it’s a natural product and easy to find and thanks to this natural element it will dry the nails quickly in a few seconds only, it will hydrate the cuticles and will reinforce naturally your nails at the same time isn’t that a miracle 🙈 I’m asking myself why I didn’t research it before because it could have helped me a lot to avoid waiting hours for nails to dry and then see marks on my nails the next morning and then have to do my nails again especially when I use a light nail polish that needs several layers that was so horrible ! well it’s never too late as it says 😜

    If you too you see marks on your nails just the next morning or even during the day because your nail polish didn’t dry enough whereas you waited hours and hours believe me you’re not alone ! by the way this is one of the reasons that made me go to nails institutes to do do my nails and the other reason is that my nails is originally fragile and they get smashed easily and every time it grows it smashed so that’s why I wanted to do it in a nail institute. At the Beauty institute I would always get a gel extension but as my natural nails continue to grow under the gel they always would get smashed because they are fragile so sometimes they would get smashed with the gel extension too and believe me it hurts 😭 and now that we were in quarantine I couldn’t go to the beautician so I thought to do my nails by myself like I used to do it before. And it began again each times my nails wasn’t dry enough and I would get marks on it 😩 and that’s when I started to do some research to find a solution to dry them quickly and correctly and I know that you’re gonna tell me but there are nails hardener or top coat that will guarantee a quick dry etc but as my nails are already fragile I don’t want to make them more fragile by using these kind of products that may contain dangerous ingredients or why not going to the beauty institute as the quarantine is over (well not completely) but for now I prefer to wait a little bit for that and so I did my research.

    COMMENT FAIRE SÉCHER SON VERNIS RAPIDEMENT ET NATURELLEMENT EN QUELQUES SECONDES ? / HOW TO DRY YOUR NAILS QUICKLY AND NATURALLY IN JUST A FEW SECONDS ?

    Et je suis tombé sur beaucoup d’astuces, et j’ai choisis celle qui me semblait beaucoup plus simple c’est à dire en utilisant de l’huile que l’on a dans nos cuisines donc je l’ai fait et j’ai utilisé de l’huile isio4 que j’avais chez moi et ça avait marché mais c’était moyen je trouve et ensuite j’ai continuée à chercher en me disant qu’il fallait peut être une huile spécifique et effectivement avec de l’huile d’olive c’est parfait 😍 et comme je vous disais mes ongles sont très fragile ils se cassent facilement et ben figurez vous que depuis que j’utilise cette huile sur mes ongles pour le séchage mes ongles ne se cassent plus 😯 et ils continuent à grandir. Et je me souviens qu’avant en touchant mes ongles ils étaient si molles que je pouvais les plier sur eux même et ils se cassaient et maintenant au toucher ils sont renforcés comme jamais ! et vu qu’ils ne se cassent plus je vais les laisser grandir pour qu’ils atteignent la longueur que je veux mais par contre j’ai dû mal à les limer pour qu’ils aient la forme que je veux 😂 j’arrive qu’à faire la forme en Amande mais je veux la forme Ballerina donc une fois qu’ils auront atteint la longueur que je veux j’irai en institut pour les faire limer en forme Ballerina et je pourrais faire des semi-permanent de temps en temps 😍 et plus besoin de rallongement gel 😏. A présent je vais vous expliquer comment j’utilise l’huile d’olive juste un peu plus bas 😊

    C’est parti !


    I found a lot of nails hacks, and I chose the one that seems more simple that mean by using cooking oils that we all have at our kitchens so I did it by using Isio4 oil that I have at home and it worked but hardly so I continued to do my research thinking that maybe it needs a specific oil and indeed with olive oil it’s perfect 😍 and as I was telling you that my nails are fragile and smashed easily well since I’ve been using olive oil my nails are no more fragile and don’t smash anymore 😯 and they still growing. And I remember that before my nails were so weak that I could fold them and it would always smashed and now they are stronger than ever ! and as they don’t get smashed anymore I’m gonna let them grow so that they will be as long as I want them to be but I can’t file them in the shape that I want 😂 I can only do the almond shape but I want the ballerina shape so once they’ll be as long as I want I’ll go to the beautician to file them in the ballerina shape and sometimes I’ll do some semi-permanent on them 😍 and no needs to do gel extension now 😏 . Now I’m gonna show you how I use the olive oil for my nails 😊

    Let’s go !


    COMMENT FAIRE SÉCHER SON VERNIS RAPIDEMENT ET NATURELLEMENT EN QUELQUES SECONDE ?

    Tout d’abord vernissez vous les ongles comme vous avez l’habitude de le faire, moi je lime un peu les bords ensuite je commence à les vernir avec une base et je laisse sécher à l’air libre. Puis je pose mon vernis et je laisse sécher un peu à l’air libre et enfin je finis avec un top coat glossy c’est à dire qui donne un effet brillant.

    Firstly, do your nails like you always do, I personally file the edges of the nails a little bit then I start to paint them with a nail base and I let it dry like this. Then I paint them with my nail polish and let it dry and then I finish with a glossy top coat which will give a glossy effect.


    COMMENT FAIRE SÉCHER SON VERNIS RAPIDEMENT ET NATURELLEMENT EN QUELQUES SECONDE ?

    Maintenant inutile d’attendre que le top coat sèche, vous prenez un peu d’huile d’olive vierge et vous le versez dans un petit bol et vous laissez tremper chaque doigt à l’intérieur pendant 30 secondes et ensuite vous pouvez aller vous rincez les mains et les doigts et c’est fini ! Bien entendu, évitez de faire des gestes brusques avec vos ongles juste après parce que l’huile va en faite figer le vernis sur vos doigts mais si vous vous amusez à gratter ou à faire autre chose sur vos doigts ça n’aura servis à rien puisque ce n’est pas du gel que vous avez sur les ongles mais c’est un vernis normale. Et le lendemain ou dans la journée, vous ne verrez aucune marque sur votre vernis il sera intact 😋 Si vous le souhaitez vous pouvez essayer avec une autre huile mais moi je trouve qu’avec l’huile d’olive c’est le top !

    Now you don’t have to wait the top coat drying, you just take some olive oil and put it in a small bowl and then let each finger soak in it for 30 seconds and then you can wash your hands and fingers and it’s done ! Of course, avoid doing abrupt gestures with your nails just after that because the oil will actually freeze the nail polish on your nails but if you scratch abruptly with it or doing other brutal things that would be useless because that’s not gel on your nails but normal nail polish. And the next morning or during the day, you’ll see no marks anymore on your nails it will be intact 😋 If you want you can try with another oil but personally with olive oil it’s amazing !


    C’est tout pour aujourd’hui ! j’espère que cette astuce vous aura

    plu et vous aura rendu service ! n’hésitez pas à partager vos astuces dans les commentaires

    ça fait toujours plaisir d’apprendre de nouvelle chose ☺️ et vous vous connaissiez déjà cette astuce ?


    That’s it for today ! I hope that you like this nails hack and that it will help you !

    feel free to tell me your nails hacks in the comments below it’s always a pleasure

    to learn new things ☺️ and you did you know this nails hack ?


    A bientôt !

    See you soon !

    XOXO 💋💋💋

    Retrouvez moi aussi sur les réseaux sociaux 😉 / follow me on social media 😉 :


  • 4 ALTERNATIVES FACILES POUR LE EYELINER / 4 EASY ALTERNATIVES FOR EYELINER ⎪TUTORIEL

    4 ALTERNATIVES FACILES POUR LE EYELINER / 4 EASY ALTERNATIVES FOR EYELINER ⎪TUTORIEL

    Hello !

    Comment est-ce que vous allez ? j’espère que tout se passe bien pour vous ☺️ je reviens aujourd’hui avec une nouvelle vidéo où je vous montre 4 alternatives faciles pour le eyeliner, donc peu importe si vous savez mettre du eyeliner ou pas dans cette vidéo je vous montre tout d’abord comment mettre du eyeliner (feutre) et ensuite je vous montre les autres alternatives dans le cas où vous n’arriver pas à en mettre et oui il existe des alternatives que j’utilise moi même dans la vie de tout les jours ! 

    Beaucoup d’entre vous me le demande souvent pour le eyeliner alors je me suis dit que ça serait bien que je fasse une vidéo où je vous montre comment je le met mon eyeliner et parfois quand je n’ai pas envie de mettre du eyeliner mais que je veux quelque chose de simple et naturel j’opte pour d’autres alternatives avec un crayon khôl etc et donc je me suis dit que j’allais vous les montrer aussi ces autres options. D’ailleurs, si vous débutez dans le make up et que vous ne savez pas comment mettre du eyeliner je vous conseille de mettre en pratique ces autres façons tout d’abord afin de vous entrainer et ensuite vous pourrez essayer avec un eyeliner feutre ou gel et avec de la pratique vous verrez ça viendra et ne vous inquiétez pas même moi ça m’arrive de foirer mon eyeliner 😝 et dans cette vidéo vous verrez un peu comment je me rattrape haha et je vous invite à descendre un peu plus bas dans l’article c’est à dire après la vidéo où je vous donne quelques explications pour chaque option.

    C’est parti !


    {English Version}

    How are you guys ? I hope everything is going fine for you ☺️ I’m back today with a new makeup video where I’m gonna show you 4 easy alternatives for eyeliner, so whether you know or not how to put an eyeliner on in this video I’m gonna show you first how I put my eyeliner on and then I’ll show you the other alternatives in the case where you don’t know how to do it and yes there’re alternatives that I use myself too in my daily life ! 

    Often a lot of you have been asking me for the eyeliner so I told myself that it would be great to do a video about it where I’ll show you how I do my eyeliner and sometimes when I don’t feel to use an eyeliner but instead want something simple and natural I usually use other alternatives with a khôl crayon etc and so I was telling myself that I should show you too these other options. By the way, if you’re a beginner in Make Up and that you don’t know how to put an eyeliner on I advise you first to practice these other alternatives so that you will train yourself and then you’ll be able to try like a gel or pen eyeliner and with practicing  you’ll see you’ll get it and don’t worry I screw up my eyeliner too sometimes 😝 and in this video you’ll see how I catch it up haha and I invite you to go below a little bit in the article that mean after the video where I give you some explanations for each option.

    Let’s go !


    4 ALTERNATIVES FACILES POUR LE EYELINER / 4 EASY ALTERNATIVES FOR EYELINER ⎪TUTORIEL

    1ÈRE OPTION: 

    Dans la première option, je vous montre tout simplement comment je met mon eyeliner avec un eyeliner feutre, généralement je préfère les eyeliners en feutre je trouve qu’ils sont beaucoup plus facile à manier et celui que j’ai utilisée dans la vidéo c’est l’un de mes eyeliners préférés c’est le Ink Liner en teinte Trooper de Kat Von D Beauty.

    In that first option, I show you simply how I put my eyeliner on with a pen eyeliner, generally I prefer pen eyeliner I think that they are easier to use and the eyeliner that I used in this video is one of my favorite one called the Ink Liner in the shade Trooper by Kat Von D Beauty.


    4 ALTERNATIVES FACILES POUR LE EYELINER / 4 EASY ALTERNATIVES FOR EYELINER ⎪TUTORIEL

    2ÈME OPTION: 

    On débute avec les autres alternatives dont je vous parlais pour pouvoir vous entrainer mais si vous arrivez à mettre du eyeliner vous pouvez aussi utiliser cette option moi j’adore utiliser un crayon marron et soit je le laisse tel quel ou alors je l’estompe un peu pour que ça donne un effet fumé et dans cette vidéo j’ai utilisée le Crayon marron Linerefine Crayon Oriental Expert Eyes de Maybelline.

    Let’s start with the other alternatives that I was talking about that you can use to train yourself but if you can do eyeliner you can also do this one I personally love to use a brown eye pencil and I let it as it is or I blend it a little to create a smokey effect and in this video I used the Linerefine Crayon Oriental Expert Eyes which is a brown eye pencil by Maybelline.


    4 ALTERNATIVES FACILES POUR LE EYELINER / 4 EASY ALTERNATIVES FOR EYELINER ⎪TUTORIEL

    3ÈME OPTION: 

    Ici il s’agit tout simplement de faire la même chose comme dans la 2ème option et j’ai tout simplement estomper et pour cette option je vous conseille un crayon khôl qui marque bien et j’ai donc utilisée le crayon Linerefine Crayon Oriental Expert Eyes en teinte noir de Maybelline.

    Here I simply did the same thing as in the second option and I just blended and for this option I recommend you a khôl eye pencil that mark really well and I used the Linerefine Crayon Oriental Expert Eyes in the shade Black by Maybelline.


    4 ALTERNATIVES FACILES POUR LE EYELINER / 4 EASY ALTERNATIVES FOR EYELINER ⎪TUTORIEL

    4ÈME OPTION:

    Et enfin pour la dernière option, j’ai pris un fards à paupière noir mat (de la palette Rose Gold Remastered de Huda Beauty) et à l’aide d’un pinceau biseauté comme dans la vidéo j’ai tracée mon eyeliner et comme vous pouvez le voir le trait de mon liner s’arrête au milieu de la paupière donc c’est à vous de choisir vous pouvez le faire comme ça aussi avec les autres options vous n’êtes pas obliger de joindre votre trait de liner jusqu’au coin interne de l’oeil.

    And finally for the last option, I used a black matte eyeshadow (from the Rose Gold Remastered Palette by Huda Beauty) and with a beveled eye brush like in the video I drew my eyeliner and as you can see my liner line stop in the middle of my eye so it’s up to you you can do it this way too with the other options you’re not obliged to join your eyeliner line to the inner corner of your eye.


    Et c’est tout pour aujourd’hui ! j’espère que cette vidéo vous aura plu et bien entendu

    aidée et si vous avez d’autres alternatives n’hésitez pas à les partager

    dans les commentaires 😉


    And that’s it for today ! I hope you like this video and of course

    that this video helped you and if you have some other alternatives

    feel free to share it with me in the comments 😉


    A bientôt !

    See you soon !


    XOXO ✌🏼 💋


    Retrouvez moi aussi sur les réseaux sociaux 😉 / follow me on social media 😉 :


  • NO MAKEUP LOOK ⎪TUTORIEL

    NO MAKEUP LOOK ⎪TUTORIEL

    Hello hello !

    J’espère que vous avez passé une très bonne semaine ! je vous retrouve aujourd’hui avec une nouvelle vidéo ! et je vous ai préparée un No Makeup Look, si vous ne savez pas de quoi il s’agit eh bien c’est tout simplement un look naturel tellement naturel que c’est comme si vous n’avez pas mis de make up donc si vous m’avez suivit, je vais vous montrer comment vous maquillez sans avoir l’air d’être maquillée (j’espère que vous voyez ce que je veux dire lol 😂).

    La première étape, c’est votre peau je pense que vous savez déjà ou que vous avez déjà entendu qu’une belle beau fait déjà toute la différence et quand je dis « une belle peau » je ne parle pas d’une peau parfaite (ça n’existe pas sauf avec l’aide de photoshop) mais plutôt d’une peau bien hydratée autrement dit une peau dont on prend soin et l’hydratation est très importante pour avoir une belle peau et j’ai d’ailleurs fait un article là dessus que je vous invite à lire si vous voulez juste ICI. Quand je parle d’hydratation, je parle d’hydratation « extérieur » c’est à dire en prenant soin de sa peau et de prendre le temps de la nettoyée (en profondeur au moins une fois par semaine) et de l’hydratée tout les jours matin et soirs avec une crème adaptée peu importe votre type de peau mais je parle aussi d’hydration « intérieur » c’est à dire faire attention à ce que l’on mange, boire beaucoup d’eau et faire un peu sport pour permettre à votre corps mais aussi à votre peau de se débarrasser des toxines etc maintenant je vous en dit pas plus et je vous laisse visionner la vidéo ! 😉

    PS: dans la vidéo, pour le teint vous être libre de choisir soit d’utiliser un peu de concealer comme moi je l’ai fait ou alors utiliser une BB crème c’est comme vous voulez et pour les lèvres c’est au choix vous pouvez opter pour un gloss ou un rouge à lèvre nude aussi ☺️

    C’est parti !


    {English Version}

    I hope that you spent a beautiful week ! I’m back today with a new make up video ! and I filmed a No Makeup Look, if you don’t know what I’m talking about it’s simply a natural look so natural that it looks like you have no makeup on so I’m gonna show you how to put makeup on without looking like you have makeup on (I hope you know what I mean lol 😂).

    The first step, it’s your skin I think you might already know or already heard that with a beautiful skin its all make a big difference and when I say  » a beautiful skin » I’m not talking about a perfect skin (that does not exist except if you use photoshop to help you) but I’m talking about to have a well moisturized skin in another words a skin that you take care of and hydration is very important to have a beautiful skin and by the way I’ve already wrote an article about it that I invite you to read if you want HERE. When I’m talking about hydration, I’m talking about « exterior » hydration that means by taking care of your skin and to take the time to clean it (deep cleaning once a week) and to moisturized it everyday night and day with a good cream adapted to your skin whatever your skin types is but I’m also talking about « interior » hydration that means to be careful with what we eat, to drink a lot of water and to do some sport so that your body but also your skin will be able to eliminate the toxins etc now I’m not gonna tell you more about it and I’m gonna let you watch the video ! 😉

    PS: in the video, for the complexion you’re free to use only some concealer like I did or a BB cream as you like and for the lips you choose too you can wear a gloss or a nude lipstick ☺️

    Let’s go !


    ❤︎ Crème Gommante Douce pour peaux sensibles de Caudalie / Caudalie Gentle Buffing Cream for sensitive skin

    ❤︎ Gommage au sucre pour les lèvres de Royal Apothic / Royal Apothic Sugar Lips Scrub

    ❤︎ Masque Tissu Illuminant pour peaux normales à sèches de INC.redible / INC.redible Brightening Sheet Mask for Normal to Dry Skin

    ❤︎ La Brume Visage Nourrissante à l’huile d’argan bio pour peaux sèche et sensible de Garnier / Garnier Organic Argan Oil Nourishing Face Mist for Dry and Sensitive Skin

    ❤︎ Crème Hydratante Nurture Me de OleHenriksen / OleHenriksen Nurture Me Moisturizing Cream

    ❤︎ Base de teint The Pore Professional de Benefit / Benefit The Pore Professional Face Primer

    ❤︎ Anti-cerne Born This Way Super Coverage de Too Faced / Too Faced Born This Way Super Coverage Concealer

    ❤︎ Le Crayon Sourcils en teinte Stud de Mac Cosmetics / Mac Cosmetics Eyebrows Styler in the shade Stud

    ❤︎ La Poudre Libre Translucent de Kylie Cosmetics / Kylie Cosmetics Translucent Setting Powder

    ❤︎ Blush en teinte Rosy de Kylie Cosmetics / Kylie Cosmetics Pressed Blush Powder in the shade Rosy

    ❤︎ Le Highlighter Riviera Illuminator de Anastasia Beverly Hills / Anastasia Beverly Hills Riviera Illuminator Highlighter

    ❤︎ Le Mascara Feel Stronger de Yves Rocher / Yves Rocher Feel Stronger Mascara

    ❤︎ Éclat Minute Huile Confort Lèvre de Clarins / Clarins Instant Light Lip Comfort Oil


    Et voilà c’est tout pour aujourd’hui !

    j’espère que cette vidéo vous aura plu et n’hésitez pas à me dire si vous préférez avoir

    un maquillage le plus naturel possible ou si au contraire vous aimez quelque chose

    qui se voit quand même tout en restant dans la simplicité ou alors

    si vous aimez les makeup bien chargés et dernière option si vous aimez

    mixer ces différents types de makeup de temps à autres comme moi 😝


    And that’s it for today !

    I hope that you like this video and tell me in the comments if you prefer a natural makeup

    the most natural possible or instead you prefer something that can be seen but simple or if

    you prefer drama makeup or last option if you like to mix all of them depending 

    the day like me 😝


    A bientôt !

    See you soon !


    XOXO ✌🏼 💋


    Retrouvez moi aussi sur les réseaux sociaux 😉 / follow me on social media 😉 :


  • MES PRODUITS FAVORIS DU MOMENT POUR LE CORPS / MY CURRENT FAVORITES PRODUCTS FOR BODY CARE

    MES PRODUITS FAVORIS DU MOMENT POUR LE CORPS / MY CURRENT FAVORITES PRODUCTS FOR BODY CARE

    Hello mes Beautyers !

    Comment est-ce que vous allez ? en tout cas j’espère que ça va ❤️ je reviens aujourd’hui avec un nouvel article dans lequel je vais vous parler de mes deux produits favoris du moment que j’adore utiliser dans ma salle de bain qui sont devenue pour moi des produits essentiel dans ma routine soin pour le corps !

    Pour vous en dire un peu plus, ça fait déjà quelques temps que je les avais testés donc vous l’aurez compris je les ai testés sur un long terme pour pouvoir me faire un vrai avis sur ces produits et aussi pour voir si il y a eu du changement positif ou négatif avec leurs utilisations. Donc je vais commencer par vous les présentés 😊

    c’est parti !


    {English Version}

    How are you guys ? I hope you’re all fine ❤️ I’m back today with a new article where I’m gonna talk about my two current favorites products that I love to use in my bathroom which became essential products during body care for me !

    To tell you more about it, it’s been some times that I tested them and that I’ve been using them so as you can understand I tried them on a long period so that I can have a real opinion about these products and also to see if there is any positive or negative change by using them. So now I’m gonna start to present you the products 😊

    let’s go !


    MES PRODUITS FAVORIS DU MOMENT POUR LE CORPS / MY CURRENT FAVORITES PRODUCTS FOR BODY CARE

    Voici donc ces deux petites merveilles ! à gauche vous avez un gel douche au beurre de muru muru & à la rose de Love Beauty And Planet et à droite on a le masque hydratant pour les cheveux à l’Aloe Vera appelé « Hair Food » de Garnier Fructis.

    Here you go with these two wonders ! on the left it’s a muru muru beurre (butter) & rose shower gel by Love Beauty And Planet and on the right it’s a moisturizing Aloe Vera hair mask called « Hair Food » by Garnier Fructis.


    MES PRODUITS FAVORIS DU MOMENT POUR LE CORPS / MY CURRENT FAVORITES PRODUCTS FOR BODY CARE

    Ce gel douche je l’ai découvert par hasard ! en allant faire les courses je devais me prendre un nouveau gel douche et j’avais envie de changer un peu et donc d’essayer quelque chose de nouveau. Et c’est là que j’ai vu ce gel douche, d’ailleurs je crois qu’ils venaient de le mettre en rayon parce que je ne l’avait jamais vu cette gamme dans le rayon à gel douche donc en voyant que c’était un gel douche hydratant ( j’ai la peau sèche) et qu’en plus c’est vegan avec 92% d’ingrédients d’origine naturel je me le suis pris pour l’essayer et j’ai bien fait 😍

    This shower gel I discovered it by chance ! while I was doing some shopping for the house buying a new shower gel was on my list and I wanted to take something different I mean trying a new shower gel. And that’s when I saw this shower gel, by the way I think that they had just put it on the shelf because I’ve never seen this brand before in the shower gel area so when I saw that it was a moisturizing shower gel (as I have dry skin) and that it was vegan with 92% of natural ingredients I took it to try and I was right to try this one 😍


    MES PRODUITS FAVORIS DU MOMENT POUR LE CORPS / MY CURRENT FAVORITES PRODUCTS FOR BODY CARE

    Donc je pense que c’est une nouvelle marque sur le marché, en tout cas ici à la Réunion il est nouveau je pense parce que je ne l’avait jamais vu auparavant et vous pouvez retrouver ce gel douche en supermarché. Je me suis renseignée sur la marque Love Beauty And Planet et je vous invite vous aussi à la consultée juste ici, car c’est une marque qui cherche à satisfaire sa clientèle tout en préservant et respectant le plus possible notre planète et franchement j’adore leur valeur ☺️. D’ailleurs, je vais peut être me commander d’autres produits de leur marque sur leur site pour les essayer vu qu’à part le gel douche les autres produits ne sont pas en vente ici en tout cas je ne les ai pas encore trouver si il y en a. 

    Ce gel douche est juste formidable 🙌🏼 depuis que je l’ai testée je n’achète plus que ça (là ici c’est ma deuxième bouteille) même ma soeur l’a adoptée haha non seulement c’est un gel douche vegan mais il est aussi composé de 92% d’ingrédients d’origine naturel tels que l’huile de coco bio (qui est très bon pour le corps d’ailleurs vous pouvez aussi utiliser de l’huile de coco bio pour vos plats en cuisine c’est très bon pour la santé), le beurre de muru muru naturel, même la bouteille est fait à 100% de plastique recyclable et ce que j’aime bien aussi avec ce gel douche c’est que c’est du 400ml donc c’est très pratique et ça vous permet de faire des économies parce qu’en général la plupart des gels douche c’est du 100ml etc et ça part très vite mais avec celui là vous en aurez sur du long terme. Et bien sûr ce gel douche existe avec d’autres senteurs comme au noix de coco etc. Quand vous l’utiliser, vous avez la peau douce et parfumée et il est vraiment bien pour les peaux sèches et sensible parce qu’il est très doux et n’agresse pas votre peau. Bref, c’est une vrai petite pépite ! quoi de mieux qu’un gel douche qui vous permet de faire des économies avec son 400ml, qui est adapté à votre type peau et qui en plus respecte notre belle planète ☺️❤️ c’est une belle combinaison je trouve et on en a besoin des marques comme celle ci car notre planète c’est notre maison et on doit en prendre soin 💚

    So I think it’s a new brand on the market, well here in Reunion Island it’s new because I’ve never seen this brand before and you can find this shower gel in the supermarket. I made some research about the brand Love Beauty And Planet and I invite you to check it too here, cause it’s a brand that wants to satisfy its customers and to respect our planet at the same time and honestly I love their value ☺️. By the way, maybe I’m gonna order the other products on their website to try them because here there’s only the shower gel that is available except if there are the other products available too but I haven’t find it yet.

    This shower gel is just amazing 🙌🏼 since I tried it I’m buying only this (here it’s my second bottle) even my sister fell in love with it haha it’s vegan but it’s also composed of 92% natural ingredients like organic coconut oil (which is very good for your body and you can use organic coconut oil for your meals too in the kitchen cause it’s very good for your health), the natural muru muru butter, even the bottle is made 100% recyclable plastic and what I love with this shower gel is that it’s a 400ml so it’s very useful and it allows you to save money because you know in general most of shower gels are 100ml etc and you run out of it really fast but with this one it will last longer. And of course this shower gel exists with different flavors like coconut etc. When you use it, your skin is soft and perfumed and it is really good for dry and sensitive skin because it’s very soft and it won’t be aggressive with your skin. Well, this is a gold gem ! what’s better than a shower gel which allows you to save money with its 400ml, which match with your skin and which respect our beautiful planet ☺️❤️ this is a fantastic combination and we need brands like this because our planet is our home and we have to take care of it 💚


    MES PRODUITS FAVORIS DU MOMENT POUR LE CORPS / MY CURRENT FAVORITES PRODUCTS FOR BODY CARE

    Passons au masque pour cheveux ! je pense que vous le connaissez peut être déjà parce que c’est un vrai best seller ! dès qu’il est sortis en supermarché je me le suis pris et je ne le regrette pas du tout 😍 donc c’est un masque hydratant « Hair Food » de Garnier pour cheveux normaux à secs, il est composé de 98% d’ingrédients d’origine naturel avec des huiles végétales, vegan, biodégradable à 96%, sans composant d’origine animale et sans silicone et ce masque vous pouvez l’utiliser de plusieurs façon c’est à dire que vous pouvez faire votre masque de différentes façon et moi j’adore le faire poser sur mes cheveux juste après mon shampoing. Moi j’ai pris celui à l’Aloe Vera mais il existe aussi à la banane et à la papaye je crois. Depuis que je l’utilise j’ai remarquée un vrai changement au niveau de mes cheveux (j’ai les cheveux fin et assez secs) mes cheveux sont beaucoup plus nourrit même mes pointes ne sont plus très abîmées comme avant et en plus il laisse vos cheveux légèrement parfumé 🙌🏼. Concernant son utilisation, je l’utilise une fois par semaine donc après mon shampoing je me rince les cheveux et je laisse ce masque posé pendant 3 minutes et ensuite je rince et tout de suite vous voyez que vos cheveux sont nourrit d’ailleurs depuis que je l’ai utilisé j’ai l’impression que mes cheveux sont devenue  « en bonne santé » 😝 

    Si vous avez les cheveux secs et même abîmé je dirais, je vous le recommande à 100% ! 

    Let’s talk about the hair mask ! I think you might know it already because it’s a real best-seller ! as soon as it was launched in the supermarket I took it and I don’t regret it 😍 so it’s a moisturizing hair mask « Hair Food » by Garnier for normal to dry hair, it’s composed of 98% natural ingredients with essential oils, it’s vegan, 96% biodegradable, free animal ingredients and free silicone and this hair mask you can use it in different ways and I love to use it just after my shampoo in the shower. I bought this one Aloe Vera but there are also banana and papaya flavor I think. since I’ve been using it, I noticed a real change for my hair (I have dry and thin hair) my hair are more nourished even the tips of my hair are no more damaged like it use to be and this hair mask let a light perfume in your hair 🙌🏼. How do I use it ? I use it once in a week so after my shampoo I rinse my hair and I let this mask for 3 minutes in my hair and then I rinse and as soon as the first use you’ll see immediately that your hair is more nourished by the way since I used it I feel like my hair became « more healthy » 😝

    If you have dry and even damaged hair I would tell, I would recommend you at 100% this hair mask !


    Et c’est tout pour aujourd’hui ! 

    j’espère que cet article vous aura plu et n’hésitez pas à me dire dans 

    les commentaires si vous aussi vous les connaissez ces deux produits ?

    et est-ce que vous connaissez d’autres marques de ce type ? 


    And that’s it for today !

    I hope you like this article and feel free to tell me in the comments if you

    know these products too ? 

    and do you know some other brands like these ones ? 


    A bientôt !

    See you soon !


    XOXO ✌🏼 💋


    Retrouvez moi aussi sur les réseaux sociaux 😉 / follow me on social media 😉 :


  • GREEN & PURPLE GLAM MAKE UP LOOK ⎟MAKE UP TUTORIAL

    GREEN & PURPLE GLAM MAKE UP LOOK ⎟MAKE UP TUTORIAL

    Hello mes Beautyers !

    J’espère que vous allez tous très bien ainsi que vos proches ❤️ et j’espère que vous ne vous ennuyez pas trop en tout cas si c’est le cas, je vous invite à aller voir mon dernier article juste ICI où je vous donne des idées pour vous occuper pendant cette quarantaine ☺️

    Et aujourd’hui je suis de retour avec une nouvelle vidéo et donc un nouveau make up ! je me suis amusée avec la petite palette de la collection Under The Sea de Kylie Cosmetics et j’ai adorée 😍 il y a de si belle couleurs et on peut faire tellement de makeup différent avec les fards de cette palette 💜 d’ailleurs si vous voulez voir un peu ce que propose cette collection comme produits je vous invite à aller voir mon article juste ICI où je vous avais présenté les produits de la collection. Donc pour ce make up, je vous ai fait un make up look avec des yeux plutôt colorés et pour les lèvres j’ai opté pour quelque chose de nude et j’espère que ce make up look vous plaira 😋 oh et je vous ai mis un mini bêtisier à la fin de la vidéo et ne me demander pas pourquoi j’ai fait ces têtes là je sais pas quoi vous répondre 😂, la seule chose que je peux vous dire c’est que je discutais avec ma soeur pendant le make up  😂

    C’est parti !


    {English Version}

    I hope you’re all fine and that your family members and friends are fine too ❤️  and I hope you’re not too bored well if it’s the case, I invite you to check my last article just HERE where I give you some ideas to keep you busy during this quarantine ☺️

    And today I’m back with a new makeup video ! I played with this little Palette from the Under The Sea Collection by Kylie Cosmetics and I loved it 😍 there are such beautiful colors and we can do a lot of different makeup with the eyeshadows of this palette 💜 by the way if you’d like to see what kind of products this collection is about I invite you to check my article just HERE where I showed you the products of the collection. So for this makeup, I made a makeup look with colored eyes and for the lips I chose a nude color and I hope you’ll like this makeup look 😋 oh and there is a tiny bloopers part at the end of the video and don’t ask me why I was doing these faces I don’t know 😂, the only thing I can tell you is that I was talking with my sister during this make up 😂

    Let’s go ! 


    ❤︎ Base à paupière Layin’Low Pro Longwear Paint Pot de Mac Cosmetics / Mac Cosmetics Layin’Low Pro Longwear Paint Pot

    ❤︎ La Palette 35B Color Burst de Morphe Brushes / Morphe Brushes 35B Color Burst Palette

    ❤︎ La Palette Under The Sea de Kylie Cosmetics / Kylie Cosmetics Under The Sea Palette

    ❤︎ Le Fond de teint Double Wear Stay In Place de Estée Lauder / Estée Lauder Double Wear Stay In Place Foundation

    ❤︎ Skin Concealer (anti-cerne) en teinte Peanut de Kylie Cosmetics  / Kylie Cosmetics Skin Concealer in the shade Peanut

    ❤︎ La Poudre Libre Translucent de Kylie Cosmetics / Kylie Cosmetics Translucent Setting Powder

    ❤︎ Le Crayon Sourcils en teinte Stud de Mac Cosmetics / Mac Cosmetics Eyebrows Styler in the shade Stud

    ❤︎ Le Ink Liner (eyeliner) en teinte Trooper de Kat Von D / Kat Von D Ink Liner in the shade Trooper

    ❤︎ Blush en teinte Rosy de Kylie Cosmetics / Kylie Cosmetics Pressed Blush Powder in the shade Rosy

    ❤︎ La Palette Winter Highlighter et teinte Northern Lights de Huda Beauty / Huda Beauty Winter Highlighter and the shade Northern Lights

    ❤︎ Faux Cils magnétique « Dramatic » de Wake Up & Make Up / Wake & Make Up « Dramatic » Magnetic False Eyelashes 

    ❤︎  Crayon à lèvre LEO de Kylie Cosmetics / Kylie Cosmetics LEO Lip Liner 

    ❤︎ Rouge à lèvre de la collection Rouge G en teinte N°1 de Guerlain / Guerlain Lipstick from the Rouge G Collection in the shade N°1


    Et c’est tout pour aujourd’hui !

    j’espère que ce Make Up vous aura plu et n’hésitez pas à me dire dans les commentaires

    ce que vous en pensez et si vous aussi vous adorez ce genre de make up coloré

    avec des lèvres nude ou alors si vous préférez le tout coloré ou nude ?

    Dites moi aussi si vous avez déjà oser des couleurs colorées sur les yeux ou 

    si vous n’osez pas et pourquoi ? 😉


    And that’s it for today !

    I hope you like this Make Up and feel free to tell me in the comments what do you think

    and if you too you love colored make up with nude lips or if you prefer all colored or all nude ?

    Also tell me if you have ever tried colored colors like this on your eyes or if you

    do not prefer to try it and why ? 😉


    A bientôt !

    See you soon !


    XOXO ✌🏼 💋


    Retrouvez moi aussi sur les réseaux sociaux 😉 / follow me on social media 😉 :